Moagenseren is the result of a creative collaboration with adventurer Monica “Moa” Hundseid , and inspired by both traditional Norwegian knitting and the hardworking people who have used these patterns in their everyday lives for generations. The classic, checkered pattern has been knitted in countless variations throughout the ages. In Moagenseren, we have taken this timeless expression and created our own version – a modern homage to the past, but with a clear touch of wilderness, the joy of needlework and a love of detail.
The five different colors in the collection are named after inspiring hardworking people in Norwegian Arctic history. Here is the story of Kitti – the name of the sweater in cream white and purple with turquoise and orange details:
Margrethe Kitti (Máhte Márge)
Reindeer herding Sami and seamstress (1884–1974)
Margrethe Lango Kitti was born on June 24, 1884 in Tromsø, on board a boat on her way into the city. She came from a reindeer herding family belonging to the Tromsdalssiida and throughout her life became a well-known and respected figure both in Tromsø and in the Sami community.
As a young woman, Margrethe was hired by Roald Amundsen's materials manager Fritz Zapffe to sew winter clothing and equipment for the Gjøa expedition through the Northwest Passage. Sami clothing was particularly well-suited to extreme cold, and Margrethe sewed, among other things, jackets, gloves, skullcaps, bells, and sleeping bags – an extensive work that was in addition to what she made for her own family.
After the dissolution of the union in 1905, the Kitti family switched to year-round reindeer herding on the islands outside Tromsøya, a right that was formalized through a royal charter in 1923. After the death of her husband Per Kitti in 1946, Margrethe became the undisputed leader of the family's reindeer herding. Despite the fact that the reindeer herd had been greatly reduced during the war, she managed to rebuild it with the help of her extended family. She had a large network within reindeer herding and good knowledge of the farms in the area.
Margrethe is described as a strong, wise and fearless woman who carried on Sami traditions and did not hesitate to speak out against the authorities. She was a familiar fixture in the Tromsø cityscape, especially at the local café "Arbeideren", where she often sat with her pipe. For the children in the neighborhood, she became a legendary figure, surrounded by stories about her knowledge and ability to "see things".
Moagenseren is the result of a creative collaboration with adventurer Monica “Moa” Hundseid , and inspired by both traditional Norwegian knitting and the hardworking people who have used these patterns in their everyday lives for generations. The classic, checkered pattern has been knitted in countless variations throughout the ages. In Moagenseren, we have taken this timeless expression and created our own version – a modern homage to the past, but with a clear touch of wilderness, the joy of needlework and a love of detail.
The five different colors in the collection are named after inspiring hardworking people in Norwegian Arctic history. Here is the story of Beret – the name of the sweater in chocolate brown and light beige with green and orange details:
"Buks-Beret" - the fisherwoman who was rougher than men
Beret Johanna Paulsdatter Dypvand was born in Kvæfjord and later settled in Ballangen in Nordland. Her story intertwines both Sami history and women's liberation. Beret was an exceptionally strong woman: From the 1820s she rowed Lofoten for almost forty years. She was captain of her own crew, ran a farm and trade, was a bear hunter, butcher and midwife – and the mother of seven children.
"She was better than men. There had to be a chosen man who could stand alongside her. She was ahead of her time in all things, and there was respect for her body, because she was iron. She was complete and utter."
As a fisherman, it was impractical to wear a jacket, dress, and skirt, so Beret chose trousers – very untraditional for her time. This is the background to the nickname Buks-Berret , and the expression "ei Buks-Berret" was later used to describe tough girls.
It was said that Beret never had any problems getting a crew for the boat, because she "knew so much"; that she had some kind of supernatural control over the sea and could calm storms, so that there was never any danger in going fishing with her.
https://linkaneumann.com/garntyper/DaI am in the process of creating a description for you how to knit the Linkapleddet from my book "Villmarksinteriør". It's the same method for the Tipipleddet, Villmarkspleddet and all the wall hangings in the book. You can find the book HERE.
You can knit the Linkapledet in as many or as few colors as you want. It's also a great way to get rid of some leftover yarn.
Things you need to knit this blanket
Yarn. The blanket can be knitted in any yarn you like. Some suggestions are Troll, Blåne, Alafosslopi, Drops Snow, Drops Andes. See yarn types
Knitting needles. 6 mm and 7 mm needles 80 cm long (or whatever gives you the specified knitting tension of 12 stitches on 10 cm).
Wool needle for sewing threads.
Sewing machine and sewing thread. If you do not have a sewing machine, you can talk to someone you know. You only need completely basic sewing skills as you only have to sew two seams back and forth.
Possibly a thin fabric if you want to sew this on the back of the blanket (I will not go through how to sew this in this blog post).
Knitting tension
The first thing you should do is knit a sample so that you get the right size. knitting tension , which is 12 stitches on 10 cm. As this is a blanket, and not something that will sit on the body, the knitting tension is not crucial for a good result, but you can end up with a very large or small blanket if you don't get it right. knitting tension .
Groove edge
Cast on sts and work back and forth in garter st until you have been given the length.
Cutting edge
When you have finished knitting the groove edge, cast on stitches for the cutting edge as shown in the picture. I then usually knit the first stitch on the next round before knitting over all the stitches Pinne 7 mm.
You can either knit the cutting edge straight or purl. The most important thing is that you know where the clipping masks are.
Then work Diagram A, B, C and D.
When you have finished knitting the diagrams, cast off the cut stitches and knit over the stitches Pinne 6 in edge color. Work garter st in specified length.
When you have finished the garter st and cast off the stitches, fasten threads. The threads that lie along the cutting edge I pull forward in the cutting edge so that I do not have to attach them.
Now it's time to take out the sewing machine 😀 Sew two seams in the cutting edge. Then cut the threads and cut between the seams.
When you have finished cutting, pick up stitches along the blanket. Then pick up stitches as the picture shows. When you have finished picking up stitches, run a thread through all the stitches.
Knit the garter st and cast off. I like to cast off with a larger pin size or with an elastic cast off.
When you have finished the grooved edge of the Linkap joint, you need to pick up stitches to cover the wound edge. The stitches you placed on a thread are now placed on a Pinne.
Then work stockinette st and sew the coating over the wound edge.
When you have finished knitting the groove edge and coating on both sides of the blanket, it is time to make fringes.
Avslutt med å skyll opp pleddet og la det tørke flatt. Gratulerer du har nå strikket ferdig pleddet ditt! <3
Photo = Stine Mette Fjerdingstad and Halvdan Jarl. How to knit Linkapleddet? Wilderness sweater
One thing I absolutely love is teaching new knitters. I think it's so fun to see someone go from knitting their very first holey swatch to finishing their first garment. So here are my tips for beginners:
🧶Knit something you think is fun even if it looks difficult! Nothing kills motivation more than knitting something as boring as a scarf or a cloth (although scarves are very nice to wear and cloth is useful!). Knitting scarves is good for learning to knit and purl, but after you have mastered knitting and purling you are ready for something more advanced. There are many different branches within knitting. I will admit that I am a bit of an oddball in this area. I have tried knitting solid colors and textured stitches, etc., but I don't think it is very fun... Find your thing, whether it is socks, mittens, textured knits or patterns 🥰
One thing I was really intimidated by as a beginner is how many up-shifts look. You take a quick look, and there are many difficult terms and abbreviations that a new knitter doesn't understand. I have to admit that if I want to knit a garment and the up-shift doesn't make any sense, I put it down right away (even now after many years of knitting).
🧶 Knitting tension : I can't stress enough how important this is. The correct way to check the knitting tension is to knit a swatch, rinse it and measure how many stitches you get in 10 cm AFTER the swatch is dry. The reason for this is that many yarns change after washing. I know that knitting a swatch is incredibly tedious and I have to admit that I rarely do it myself. So if you really don't want to: start by knitting the sleeves and measure there. If the knitting tension is wrong on the sleeves, it's stupid, but not a crisis. Then you can correct the needle size you use for the body and yoke.
The knitting tension also changes as you become a better knitter. New knitters often sit a little tense and tighten the thread on the fly. It's not just your head that has to learn all the movements and techniques, but your muscles take some time to recognize the movements before you finally do it automatically.
🧶Mistakes in knitting: When you're a new knitter, you make a lot of mistakes. Everything from losing stitches to knitting the pattern wrong. The first proper garment you knit will have a lot of mistakes, but then you learn from your mistakes. Many mistakes can be corrected and you don't necessarily have to redo the whole sweater if you see that you've made a mistake or 5. Some mistakes can be lived with and others can't. If I make a mistake and feel in my body that I should address it or start asking others "do you see this" then I know within myself that I have to address it! 🤭
I even spent a long time becoming a good knitter because I did not have anyone to train me. My mother and sister have been knitting a lot for years, but by the time I learned to knit I moved around a lot and did not have access to help. I have therefore become very good at correcting mistakes in elastic.
🧶 Sitting position: Have support behind your elbows when you knit and relax your body. I myself have been through rounds where it felt like I had gone paralyzed in both arms, and I thought I would never be able to knit again. My neck muscles were so stiff that my arms didn't get enough blood. I knit between 4 and 8 hours every day and my knitting position is absolutely crucial to preventing inflammation. Now I'm in a special situation because I live off the knitting, but once you get inflammation it's hard to get rid of it.
🧶
Hope this was helpful! Good luck with your knitting – and remember that you can always ask us for tips, advice and guidance about my patterns. Then send us an email to post@linkaneumann.com – we will respond as quickly as we can.
Fitting sweaters has gained an undeserved bad reputation for being extremely difficult. I have therefore made a pattern on how to assemble to shatter this myth. Assembly is not difficult, just very boring haha. I want to point out that there are many ways to mount, but this is how I do it: D
(Photo: Åste and her friend on a trip in Pasvik with Norwegian forest sweaters knitted in Alafosslopi. They mounted for the first time and they were sooo good !!: D).
What you need to assemble are:
Knitting needles.
Needle with round tip.
some leftover yarn.
Sewing machine. (If you have never used a sewing machine before, practice on a newspaper. New sewing machines are very easy to use and the only skill you really need to learn is to sew forward and be able to press the lapel button for a few seconds).
Step 1
When you have finished knitting the sleeves and the front and back piece, attach the threads. (Sleeves should be cast off and remember to cast off loosely! Feel free to use a larger one Pinne to fall off. Do not cast off stitches on front and back piece.). When I have cast off the sleeves, I leave 1 meter of thread left so that I can use it to sew in the coating later.
Step 2
Place the front and back piece on two long circular needles as shown in the picture and cast off 3 stitches on each side of the front and back piece so that it is easier to reach with the sewing machine. Use stitch markers to mark where the neck should be. Measure the width of the sleeve and use some leftover yarn to mark where to sew. Sew around this stitch as shown in the picture. I usually sew two or three times. I sew with straight stitches. Many people prefer zik-zag nails. I have tried both and notice no difference so I use straight stitches because I feel that I get better control when I sew.
Step 3
Turn the front and back piece. Knit the shoulders together. When you knit the shoulders, cast off as you would otherwise, but instead of picking up 1 stitch, pick up 2 stitches. Stop when you reach the neck.
Cut up between the seams and sew in the sleeves. I usually sew them in by hand. Use stitch markers to make sure it is evenly distributed.
Use yarn to sew in the sleeves. Elastic is longer in width than in height and therefore you sometimes have to pick up 2 "bridges" between the stitches instead of 1. The rule of thumb is to pick up 2 "bridges" at once for every third stitch, but this varies from garment to garments since no two knit exactly the same. So therefore it is important that you use mesh markers so that you always stay up to date on whether you should pick up 1 or 2 "bridges".
Step 4
Sew over a round with the sewing machine inside out over the "hand stitch" to make sure it holds. Sew the coating over the wound edge.
Step 5
Now knit the neck. Pick up a stitch from each shoulder so that there are no holes and knit the neck 😀
Congratulations! You're done now! Put sweater in water and dry it flat.
Welcome to my little course on how to knit the Wilderness Sweater!
You can also use this guide to knit my other sweaters with round yoke.
NB: the instructions here are based on the original version of the Wilderness Sweater (polar), so always read the pattern carefully if you knit one of the other versions (mid-season, Vams, children).
I have also made a thick version in Vams from Rauma , a 2-ply carded yarn made of 100% Norwegian wool. Vams is a rich, lightly spun yarn that contains a lot of air, which makes the sweater feel light and airy.
The Wilderness Sweater also comes in a mid-season version which is a thinner version. The yarns used for this are Luna , Varde and Vidde from Hillesvåg, or Icelandic Lettlopi (a thinner yarn than Alafosslopi).
The different patterns for the Wilderness Sweater can be found here:
New knitters often knit either very loosely or very tightly. I can't emphasize enough how important it is to check the tension. You can easily do this by knitting a swatch, rinsing it and measuring how many stitches you get in 10 cm AFTER the swatch is dry. The reason for this is that many yarns change after washing. In the pattern for the Wilderness Sweater Polar there are 13 stitches in 10 cm, for the Wilderness Sweater in Vams there are 14 stitches in 10 cm, and for the mid-season there are 18 stitches in 10 cm, which means you should use the needle that gives you this number of stitches. Therefore: if you knit super tightly without adjusting the needle size, you will get a tiny sweater.
It is also very common to knit much tighter in patterns than solid color knits, so here you often have to increase your needle size to get the right fit. knitting tension .
The knitting tension also changes as you become a better knitter. New knitters often sit a little tense and tighten the thread on the fly. It's not just your head that has to learn all the movements and techniques, but your muscles take some time to recognize the movements before you finally do it automatically.
Strikker du stramt, vil en glattere pinne i metall eller polert tre gjøre at garnet glir lettere, slik at du unngår at pinnene «setter seg fast». Strikker du derimot løst er bambuspinner et bedre valg, fordi det gir mer friksjon som unngår at maskene sklir ut eller blir veldig løse. Men viktigst av alt: prøv deg frem og se hva du liker best.
If you knit loosely, one can Pinne with more friction (wood, bamboo) help you gain better control and avoid the stitches slipping out or becoming very loose.
How to knit the right size for you:
Measure around your chest and add between 5-10 cm to find the right width. Choose based on how tight you want the sweater to be, and whether you want room to wear clothes underneath. If you are going to wear the sweater a lot outside in rain and snow, the wool sweater will also shrink, so it is better for the sweater to be a little too big, than a little too small.
If you knit the sweater too tight, the sweater often slips up on the yoke and you have to constantly pull it down.
In order for the sweater to be the correct size in relation to the stated measurements, it is important that the number of stitches per 10 cm is correct, also on the pattern. Therefore, you may need to increase the needle size by 0.5 to 1 on the pattern so that the sweater does not become too tight.
The sizes given are standardized, but every body is different, and you can adjust the length of the arms and torso if you want them longer or shorter. It is completely impossible to make a size that fits perfectly on absolutely every body shape, so when you have become more experienced you can play around and mix things up a bit. Maybe you want a curve in the waist? Then you can go down in needle size in the middle of the torso so that it is tighter right there. In other words, you can use both the number of stitches and the needle size ( knitting tension ) to make the sweater exactly the way you want. But as a brand new knitter, it's a good idea to stick to the pattern.
🧶
Part 2: Get started knitting!
How to knit a bodysuit:
I use the “long tale cast on” method when casting on stitches. This is the most common method of casting on stitches in Norway. I usually calculate that an arm’s length (from fingertip to armpit) of yarn is about 50 stitches: if I am going to cast on 200 stitches I calculate 4 arm’s lengths of yarn plus a little extra to be absolutely sure I have enough yarn to cast on before I make a loop, which is the first stitch. Cast on the stitches on the stated needle size.
(Tip: When I count the number of stitches, I first count 50, place a marker, count 50, place a marker, etc. If you count everything at once, you will quickly lose count, especially if someone tries to talk to you while you are counting. All knitters know how annoying that is!)
If you find it difficult to put on, I can happily tell you that most fresh knits think that this is the most difficult part of the whole sweater. Note! try to cast on so that you can pull the yarn back and forth on the needle, not too loose, but also not too tight.
Ribbed table:
Now you are going to start knitting rib. The purpose of rib is to create a kind of “knit” at the bottom, but also to prevent the body from curling.
The sweater is knitted in the round so the first stitch you knit is the very first stitch you cast on. Make sure the stitches are not twisted on the needle. If you start knitting with the stitches twisted you will end up with a kind of pretzel that is impossible to save.
In the turn-up of the Wilderness Sweater, you knit 1 knit stitch and 1 purl stitch. The knit stitches are shaped like a V, while the purl stitches are just a reverse knit stitch, and it has a kind of “pearl”. Many new knitters find rib difficult and a bit confusing. If you feel like you are losing all motivation from rib, knit it a little shorter than what is written in the pattern.
Tip: If you tend to knit very loose rib, you can knit “twisted knit” or “twisted purl” to make the rib tighter. I like the ribs really tight so I often knit twisted purl .
Pattern:
After ribbing, you should change to thicker fabric as stated. Pinne . You do this by knitting over the stitches in stockinette stitch on a circular needle. Stockinette stitch just means that you will knit only straight stitches. And now you are ready for diagram A. The diagram is read from right to left. You can put a post-it note over the rows you have not yet knitted to get a better overview of where you are in the diagram. Move the post-it note up as you finish a round.
There are many different methods for knitting patterns. Some people like to hold the threads on their index fingers, while others like to hold one in each hand. Find the method that works best for you. It is very common to knit much tighter with more threads, so try relaxing your hands. You may also want to increase the needle size in the pattern to get the right knitting tension .
Be constant with where you have the colors. The dominant color should be closest to the knitting so that it is highlighted and "pops". If you change the space on the threads, the result will be uneven. I usually have a skein lying to my left, and one to my right so that they do not spin together.
If you are completely fresh and have not quite gotten the knitting into your fingers yet, I recommend that you drop the pattern at the bottom and knit body and sleeves in one color so that you get the straight stitches into your fingers before you start on the pattern on the carrier piece.
See HERE for tips on how to knit patterns with thread in multiple colors.
The rest of the body:
Hooray! You are now done with the tiring part. Now you only need to knit solid-colored stitches for the body when you reach the specified measurement.
PS: It is common for new knitters to lose stitches, or to make new stitches along the way. Count over to make sure the number of stitches is correct. If the number of stitches differs: if you have lost stitches without picking them up again, you must take a small needle and a thread of yarn and pick up the stitch. Then sew the stitch together with the stitch above and sew the thread to the inside of the sweater. However, if you have managed to increase the number of stitches by accident, you must decrease these by knitting stitches together evenly distributed on the next round. You decrease stitches by knitting two stitches together.
How to knit sleeves
Ribbed cuffs on sleeves:
You start with double pointed needles in the specified needle size. Double pointed needles are also called set needles. The first thing you do is cast on stitches. A set of double pointed needles consists of 5 needles where you cast on stitches divided over 4 needles and use the fifth needle to knit with. There are so few stitches at the bottom of the sleeves of the Wilderness Sweater that I usually only use 4 needles for the rib (I cast on 3 needles and use the fourth to knit with).
There are two different ways to cast on stitches on double pointed needles: you can either cast on all of them in one Pinne and distribute them over 3 needles afterwards, or you can cast on the stitches evenly across the needles at once (I usually cast on the stitches evenly across the needles at once).
The sleeve is knitted round and round, just like the body. Make sure nothing has twisted before you start! The first few rounds are a bit tough, and here the needles often fly around a bit and it feels a bit chaotic, but it gets better as you go! When you have finished knitting the stitches on a Pinne , you just continue knitting on the next Pinne . Be sure to tighten a little when you start knitting a new one. Pinne . It is easy to get a little loose in the transitions and you want to avoid that. Continue around and around until the rib measures the correct length.
Increases after rib:
When you have finished knitting the rib on the sleeves, you should both change needle size and increase stitches.
You do this by knitting the stitches onto thicker double pointed needles in the specified size, while increasing the number of stitches stated in the pattern evenly. Here you have to knit over the stitches on 4 needles (and not 3 as in rib) as there are more stitches on the needle. You increase stitches by lifting up the small “bridge” between two stitches and knitting this twisted. It is important that you knit the stitch twisted so that it has a little “twist” to avoid holes in the knitting. If you are unsure how to increase stitches, you can watch this video for example.
The pattern at the bottom of the sleeves:
Knit pattern at the bottom. Knitting pattern with double pointed needles can be a bit tricky and it can easily get a bit tight. Make sure the threads on the inside are not too tight. Try them on as you go.
Increases:
Following the pattern, you should start increasing stitches. The stitches should be increased under the sleeve so that they are less visible. Start by marking the middle stitch under the sleeve (the first stitch on the round). You should now increase one stitch on each side of this stitch (two stitches increased) every 8th round until you reach the stated number of stitches. I usually use right and left-facing increases. If you are unsure how to do this, you can take a look HERE .
As you get a little more stitches on your double pointed needles, you can switch to a small circular needle size 6 (40 cm long). Knit the sleeve to the stated, or desired, length.
How to put the sleeves on the body
Many people think that it is super difficult to put the sleeves on the body. It is absolutely insanely easy! The sweater now looks like this: sleeve, front, sleeve, back. The beginning of the round is behind the left sleeve.
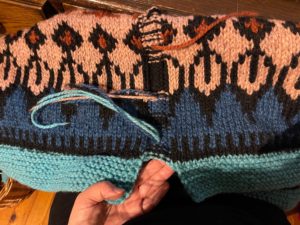
Here's how: when you have finished knitting the sleeve, place the specified number of stitches, from the underside of the sleeve, on a thread as shown in the picture.
The sleeve is finished knitting and stitches are set aside for armholes.
Take out the body and put the specified number of stitches on a thread. Then knit over the sleeve on the same Pinne as the ball.
Stitches from sleeves and body are set off. The sleeve is now ready to be knitted over on the same Pinne as the ball.
Now continue knitting to the other side of the body and place the stated number of stitches on a thread. Knit over the next sleeve in the same way and continue knitting until you reach the beginning of the round.
How to knit the carrier piece
The pattern on the center front of the sweater
The beginning of the round is behind the left sleeve. So to find out where to start to center the pattern, you first need to mark the center front of the sweater.
The easiest way to get the pattern centered is to mark each and every stitch to be knitted in pattern color from the middle of the front of the sweater until you get to the beginning of the round.
The repeat is 6 stitches, so you mark a stitch, count 5 and mark the 6th stitch, count 5, mark the 6th stitch, etc. until you reach the beginning of the round. Now you know exactly which stitch to knit first in the pattern color.
When you knit the paws you do the same. The repeat is 16 stitches so you mark 16 stitches mid front, mark 16 stitches again etc. until you reach the beginning of the round.
Here I have marked where the paws should be.
Trap evenly distributed
After you have finished knitting the first part of the diagram, decrease evenly:
If I have 200 stitches on the needle and I need to decrease 40 stitches, I divide 200 by 40. Then I get 5. That means I need to decrease every 5th stitch. Then I start by knitting 4 stitches. Decrease. The stitch I now have on the right Pinne counts as 1 stitch since it was the previous stitch you decreased, not the one you now have on the needle. So then I count 1 (the one you have on the needle), 2, 3, 4 and decrease the fifth stitch. Repeat.
If you are told that you should decrease, for example, every 4.3 stitches, it might be a good idea to note how many stitches you have counted with a row counter.
You can also use stitch markers and mark every 5th stitch so you know exactly where to decrease, and you don't have to count while decreasing. This takes a little longer, but then you are sure to decrease the correct number.
Twist threads and trap in diagram
When you knit the paws, the threads can get very long on the inside. I don't normally twist the threads that often when I knit with flea yarn because it feels good on the inside of the sweater, but behind (and between) the paws the distance is so long that it is necessary here. It is as easy as it sounds. You just need to make a small twist at the back so that the thread stays close (as shown in the picture). Be sure to tighten it a little when you continue knitting with the yarn you have picked up. If the thread gets too loose, it may be visible on the outside of the sweater.
When knitting the paws you should decrease in the diagram. A “V” represents 1 stitch so you just knit these two stitches together.
Part 3: Completion
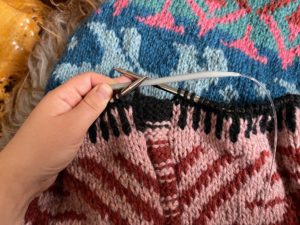
Sew together under the arms
Now you put the stitches under the sleeve onto 2 double pointed needles. I usually pick up 2 stitches on each side so that there are no holes. Then you turn the sweater inside out and join the stitches under the sleeves from the wrong side – as shown HERE .
When sewing in threads afterwards, use a little thread and “seal” any holes. Sew in loose threads.
Rinse freshly knitted garments
Newly knitted garments made of wool (not super-wash) should be rinsed after they have finished knitting.
There are several reasons for this. Newly knitted sweaters are very stiff and uncomfortable to wear. The pattern is also often a bit dented. After washing, the fibers "relax" and the wool becomes softer and the pattern becomes completely even. When the wool is wet, you also have the opportunity to stretch in shape. I usually stretch the support piece so that it is completely even.
The yarn can also contain remnants of excess color that are a good idea to get out.
I usually put the sweater in a bucket or in the bathtub with lukewarm water. Then I squeeze all the air out of the sweater. Then I let it drain a little and squeeze the excess water out of the sweater. Finally, I put the sweater on a towel and roll the towel into a sausage. I usually do this a couple of times (with a new towel) before finally drying the sweater flat. You dry wool garments flat because wet wool stretches, which is quite nice to know if you actually want it to last longer in some places. Alafosslopi takes a while to dry, so if you have a warm bathroom floor you can dry it there.
CONGRATULATIONS!
Now you have knitted your Wilderness Sweater, and are ready for new adventures!
🐾
Would you like further advice and guidance? Join our knitting group on Facebook, you can find it HERE!
You are also welcome to send us an email to customer service - we will respond as quickly as we can: post@linkaneumann.com
I primarily knit garments for outdoor activities and for use in the elements, and therefore I usually choose untreated Norwegian and Icelandic wool. Nordic wool is very robust and durable!
When I write untreated wool, I mean wool that has not been superwashed. I am one of those who does not use superwash yarn – a treatment of wool where a plastic coating is applied to the wool fibers so that it can be machine washed. When yarn is superwashed, it also loses the wool's self-cleaning and breathable properties. It is the wool fat lanolin that makes the wool self-cleaning and this disappears when a yarn is superwashed.
Norwegian wool is fantastic! We have several different breeds of sheep in Norway, and they can be divided into two “main types”: Sheep breeds with two types of wool (guard and undercoat) and sheep breeds with only undercoat. If you are in doubt about what guard and undercoat are, you can take a look at a polar dog. The long, stiff, robust hairs you see on the dog are guard hairs. These make sure that rain and dirt do not get into the dog's coat. The undercoat, on the other hand, keeps the dog warm and is very soft.
Norwegian yarn from sheep with only underwool (crossbred):
The sheep with only undercoat are called crossbred. Their wool consists of long, very durable fibers that can withstand A LOT! I prefer Rauma 3-ply, a carded yarn which means that the fibers lie “pile to pile”. There is more air in the yarn, which makes the garments lighter (than, for example, with Peer Gynt which is a worsted yarn where the wool lies parallel and can be experienced as denser and clammy to wear). The disadvantage of using wool without guard hair is that the garments are not water-repellent on par with yarns such as Álafosslopi.
It is important to mention that all untreated wool contains residues of the wool grease from the sauce which makes the garment water-repellent to a certain extent. You can also add lanolin to the garment with a lanolin wash if you wish.
I use a lot of Icelandic wool (Álafosslopi, Lettlopi and Platulopi)! These yarns contain both guard hair and underwool. The underwool is soft and the guard hairs are stiff. The guard hairs and lanolin in the wool make the garment robust and water-repellent. The Icelandic sheep is related to the old Norwegian sheep breeds and has great similarities with them. There are many reasons why I use a lot of Icelandic wool:
🧶 Wool is warm, durable, water-repellent and very nice to look at.
🧶 The outer hairs rise like a halo around the sweater when it rains.
🧶 In addition to the wool's good quality, it is produced in an incredible number of beautiful colors!
The yarns can be a bit itchy, but Icelandic wool is not strictly intended to be worn close to the body. I wear my lopi sweaters as jackets and almost always have a thin wool top underneath.
For those of you with sensitive skin: I know there are some out there who find wool to be very itchy. Wool always gets softer after washing and after use, so don't judge the wool until you have knitted and rinsed the garment. Tip: wool soap and conditioner from Lopi can be found here.
🧶Garnalternativer pinne 6 mm (13 masker på 10 cm):
Suitable for those who will be wearing the garment outdoors a lot in all kinds of weather. This yarn contains guard hair and underwool from the sheep, which makes it water-repellent. Garments knitted in Álafosslopi can withstand a lot of hard use, but it does feel a little lumpy when worn, so it is better to knit the sweater too big than too small. The yarn can be itchy, so I recommend wearing wool underwear underneath.
This yarn is unspun so it can be a bit difficult to knit with as it frays easily. But you get an incredibly light, warm and soft sweater, with the same properties as Álafosslopi. To match Álafosslopi in thickness you have to knit with double thread .
A yarn from Norwegian fur sheep. All the wool is dyed in the sheep's natural color, which is gray, giving the wool a special shine. High quality yarn. Well suited for outdoor activities.
A soft and good wool yarn made from underwool. This is a very good alternative to Álafosslopi if it is too coarse for you. Well suited for outdoor activities.
A 2-ply knitting yarn made of 100% Norwegian wool. The yarn is full and airy and makes light and warm garments. It is very easy to knit and is well suited for felting.
Suitable for those who will be wearing the garment outdoors a lot in all kinds of weather. This yarn contains guard hair and underwool from the sheep, which makes it water-repellent. Garments knitted in Lettlopi can withstand a lot of hard use, but it can feel a little lumpy when worn, so it is better to knit the sweater too big than too small. The yarn can be itchy, so I recommend wearing wool underwear underneath.
Vidde is a soft, high-quality Norwegian yarn made of lamb wool which is great if you are going to use the sweater both indoors and outdoors. The yarn only contains underwool, which means that it is not as water-repellent as Lettlopi, but in return you get a much softer garment. Wool contains lanolin, which is the sheep's natural wool fat. This means that all yarns made of untreated wool (not superwash) are water-repellent to a certain extent. Lanolin also makes the garment self-cleaning. Suitable for both outdoor activities and everyday garments.
A yarn from Norwegian fur sheep. All the wool is dyed in the sheep's natural color, which is gray, giving the wool a special shine. High quality yarn. Suitable for both outdoor activities and everyday garments.
This yarn is unspun so it can be a bit difficult to knit with as it frays easily. But you get an incredibly light, warm and soft sweater, but the same properties as Álafosslopi and Lettlopi.
🧶 Hip wool from Hipknitshop (100% Peruvian wool):
A super soft alternative for those who itch. Great for everyday wear.
Yarn options Pinne 3.5 – 4 mm (22 stitches on 10 cm):
A shiny, soft and airy fur wool yarn from Hillesvåg Ullvarefabrikk spun from wool from Norwegian fur sheep. Norwegian fur sheep are a Norwegian breed of sheep different from the Norwegian white sheep. The wool contains both light and dark fibers, and the dark fibers give the yarn and the colors an exciting depth and melange.
a soft, airy and resilient yarn from Hillesvåg Ullvarefabrikk. Sol lamb wool yarn can be combined with Tinde fur wool yarn, and is used with Ask from Hillesvåg in the book Wilderness Sweaters for Children
2-ply carded yarn from Hillesvåg Ullvarefabrikk that produces durable, light, airy and warm garments. It is very versatile and due to the airiness of the yarn it can be used with different knitting tensions. The yarn is not superwashed, and can therefore be felted.
a 3-ply carded yarn. With its 3 threads, this yarn is particularly durable and long-lasting. 3-ply Knitting Yarn produces airy, warm and durable garments. The yarn quality is mainly used for traditional sweaters and cardigans, but it is also well suited for solid-colored garments and structured knitwear. This yarn is perfect as a replacement for Sol og Ask from Hillesvåg Ullvarefabrikk.
Then I finally made a blog post about how to knit the cardigans from my books. In this post I will consider the Alasuq cardigan, but the procedure is exactly the same in all my cardigan models.
Jeg må gjøre oppmerksom på at det er mange forskjellige måter å lage en kofte på, både i fremgangsmåte og knappestolper. Her skal jeg jeg vise den metoden jeg bruker. Om du ønsker å bruke en annen metode er det bare å gjøre det 😀 <3
Dersom du er nybegynner anbefaler jeg å lese blogginnlegget mitt om hvordan man strikker genser med rundfelling først<3 Kan leses HER.
I would like to regret in advance that the light in the pictures is so poor. I live in a house from 1939 and the windows at that time were not that big
Cutting edge
You start by knitting the rib back and forth and when you are done, make a cutting edge. Here you cast on stitches by making loops across. I usually knit the cutting edge with purl stitches to make it easier to see where they are, but if you want to knit straight stitches, it's okay too.
When you go from straight stitch to purl stitch, it can be a little loose in the transition, so be sure to tighten a little more. In the patterns with a pattern, I usually twist the threads I do not use before and after I have knitted the wrong stitches to get all the threads over to the next round.
When do you finish knitting the cardigan. Remember to cast off the clipping masks before starting on the neck.
Threads
I usually pull out all the threads in the cutting edge so that I do not have to fasten a million threads. As a rule, I rinse the cardigan and let it dry before sewing so that I can shape it in a wet state.
Forward with the sewing machine
Det eneste du trenger å kunne er å sy frem og tilbake og du trenger ikke ha noen spesielle ferdigheter innenfor sying. Dersom du kun skal strikke denne ene koften er det ikke noe poeng i å kjøpe egen symaskin hvis du ikke allerede har en liggende, men det er en veldig god investering hvis du har planer om å strikke kofter og gensere med isydde ermer i fremtiden. En symaskin åpner opp en helt ny verden av plagg du kan lage til kjente og kjære<3
Sew two seams on each side of the cutting edge. I usually sew twice with straight stitches. I sew with straight stitches because I like to cut up before I knit the buttonholes, and therefore want as much hold as possible.
Cut between the seams
Pick up stitches
Cast off
I tend to drop by Pinne 6 mm so that the button bar is nice and elastic.
Pick up masks for coating
Stuff excess threads
Sew in coating with loose stitches
Now you pick up stitches in the same way as the first button bar, but now you also have to make buttonholes evenly distributed. I have used threads to mark where my buttonholes should be.
How to knit buttonholes
The buttons I have given in the pattern are 25 mm, but here I use 22 mm. When using buttons that are 25 mm, the buttonholes are a little narrow the first few times you use the cardigan, but fold out quickly.
Now it's been a while since I've shared a blog post and today I suddenly felt like writing a post about one of my own favorite designs, namely the White Bear Sweater! I have been asked a number of questions about how to increase stitches on the sleeves when there is a pattern and I will also explain there here.
Pictures from this winter! Photo: Marte Stensland Jørgensen
In the fall of 2019, I started working on my second book, “Wildlife Sweaters 2 - Warm Sweaters for Adventurers, Big and Small”. I must honestly admit that I found it very scary to start book 2. Suddenly I felt pressure to deliver since my first book had sold so well. I therefore decided to work non-stop from the fall until the book went to press. The working days were extremely long and I didn’t know what my free time was. After the book went to press, it took many weeks before I “landed”, but when I held the book in my hands for the first time in August, I felt that it was worth every single hour! I was so proud that I had to shed a few tears. I also have to add that I have had incredibly good help from my test knitters!
Two of the Polar Bear sweaters I knitted this winter! I knitted the red for myself and I'm really looking forward to using it: D
The idea for Kvitebjørn came from my old job. I always sat fiddling with things and drawing on all sorts of sheets at work so I got a small wallet from two colleagues (I think they were reasonably tired of all their sheets being cluttered haha). The same day I drew the first draft for Kvitebjørn and I wanted so much to start knitting that I had to order yarn right away! As usual, I had to reach out a bit. The bear's head became too big compared to the rest of my body so I reached up and knitted again.
The sweater is knitted with 8 colors, but you never knit with more than 2 colors at a time. I have also made a children's change and a version with 4 colors. All the versions can be found in my book. (The book can be ordered here) .
One of my drawings of what the bear should look like. This picture was taken in our home and I have also decorated the door in the dining room with a Polar Bear: D
When I finished the first sweater I was so happy that I had to knit another one right away! During the winter, I ended up knitting 7 or 8 White Bear sweaters.
I so wanted one of the pictures of Kvitebjørn in the book to be taken on Svalbard. I therefore sent a White Bear to Melissa Schafer who has published a book about Polar Bears together with her boyfriend Fredrik Granath! They were going up to Svalbard to work and were to take some pictures while they were there. This was just before the municipal boundaries were closed due to Korona. I got a message from Melissa that they had so little time before they had to go again, but they did get some pictures! I felt really stressed! because I so wanted to include the pictures in the book from Svalbard. But luckily it worked out.
One of the pictures Melissa Schafer sent me before they had to leave Svalbard due to coronary restrictions. Photo = Fredrik Gran ath
The polar bear sweater is a pretty decent sweater to knit, even for beginners. But there are simple things that I have been asked about that I will explain here: D
Long distances and knitting tension
One is that you have to twist the threads when there are long distances. Twisting the thread is exactly what it sounds like. You just have to catch the thread that becomes long with the thread you are knitting with. There are lots of videos on youtube on how to do it and you can search for "how to catch floates in knitting". It is also very common to knit tighter in the pattern so it is quite possible that you will have to use a larger needle size than what is stated as the recommended needle size.
How to increase when there is a pattern on the entire sleeve
The other thing people are wondering is how to increase stitches in pattern. This is much easier than it seems at first glance. I usually knit a purl stitch in the middle of the sleeves to make a clear distinction between the start and end of the round. You knit up to where you want to increase stitches on each side of the purl stitch.
This is what the inside of the sleeve looks like.
Increase on right side of center stitch =
See where you are in the chart. So let's say you are in row 10 and stitch 3 when you have finished the round and are ready to increase (right picture). Use sheets to mark where in the chart you are. Slides the sheet one stitch away to the left. As you can see in the picture, increase in dark pink (left picture).
Increase on the left side of the middle mask =
You do exactly the same as on the right side just the opposite. Find out where you are in the chart and slide the sheet a notch to the right as the picture shows. Now you should increase in light purple.
How to knit the bears
Knitting the bears can be a little confusing! My best tip is to use the sheet again and lay it over the rows you have not yet knitted.
Yarn for Kvitebjørn
Which yarn you should use depends on the use. I prefer Lettlopi, Vidde lamull yarn and Varde fur wool yarn that I have stated in the book, but it is possible you will want a sweater with other properties and appearance. Here is an overview of some of the options🐧
🌲🐑Easy running = Suitable for you who will use the garment a lot outside in all kinds of weather. This yarn contains cover hair and undercoat from the sheep which makes it water-repellent. Garments that are knitted in light lopi can withstand a lot of hard use, but it feels a bit tangled with use, so it is better that you knit the sweater too big than too small. The yarn can itch so I recommend wearing wool underwear underneath.
LatPlatulopy = This yarn is unspun so it can be a little difficult to knit with since it breaks easily. But you get an incredibly light, warm and soft sweater, but the same features as Lettlopi.
🐑🌲Vidde lamull yarn = Vidde is a soft Norwegian quality yarn from lamb wool which fits great if you are going to use the sweater both outside and inside. The yarn only contains undercoat, which means that it is not as water-repellent in the same way as light lopi, but in return you get much softer garments. Wool contains lanolin, which is the sheep's natural wool fat. This means that all yarns that are made of untreated wool (not superwash.) Are to a certain extent water-repellent. Lanolin also makes the garment self-cleaning.
🐑🌲Varde fur wool yarn = A yarn of Norwegian fur sheep. All the wool is dyed on the sheep's natural color which is gray, so the wool gets a special shine. High quality yarn. Suitable for outdoor life.
🐑Pure merino from mimilano = A yarn for you with very sensitive skin. 100% merino. Fits everyday clothes.
🐑Alpaca tweed from DSA = A tweed yarn of alpaca and wool. I react to alpaca so I can unfortunately not say much about this yarn other than that it looks beautiful. Garments in alpaca get wet very quickly outside so it is not suitable for outdoor life.
🐑Drops Nepal, Alpaca wool from sandnes yarn or Big strong from DSA (these yarns contain alpaca and wool) = Suitable for everyday garments.
Faroese speech from DSA, Drops Air or Drops brushed alpaca silk = Brushed alpaca. Here you get a slightly "puffy" look on the garment (suitable for indoor use).
🐑Drops Alaska = 100 percent wool. Suitable for both outdoor and indoor use.