

https://linkaneumann.com/garntyper/DaI am in the process of creating a description for you how to knit the Linkapleddet from my book "Villmarksinteriør". It's the same method for the Tipipleddet, Villmarkspleddet and all the wall hangings in the book. You can find the book HERE.

You can knit the Linkapledet in as many or as few colors as you want. It's also a great way to get rid of some leftover yarn.
Things you need to knit this blanket
Knitting tension
The first thing you should do is knit a sample so that you get the right size. knitting tension , which is 12 stitches on 10 cm. As this is a blanket, and not something that will sit on the body, the knitting tension is not crucial for a good result, but you can end up with a very large or small blanket if you don't get it right. knitting tension .
Groove edge
Cast on sts and work back and forth in garter st until you have been given the length.

Cutting edge
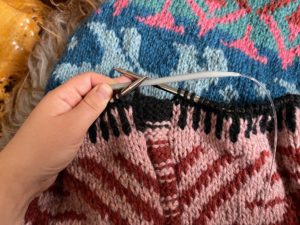
When you have finished knitting the groove edge, cast on stitches for the cutting edge as shown in the picture. I then usually knit the first stitch on the next round before knitting over all the stitches Pinne 7 mm.


You can either knit the cutting edge straight or purl. The most important thing is that you know where the clipping masks are.
Then work Diagram A, B, C and D.
When you have finished knitting the diagrams, cast off the cut stitches and knit over the stitches Pinne 6 in edge color. Work garter st in specified length.
When you have finished the garter st and cast off the stitches, fasten threads. The threads that lie along the cutting edge I pull forward in the cutting edge so that I do not have to attach them.

Now it's time to take out the sewing machine 😀 Sew two seams in the cutting edge. Then cut the threads and cut between the seams.
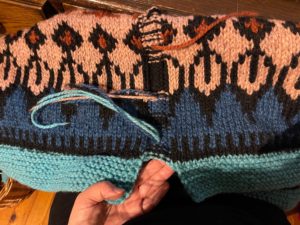

When you have finished cutting, pick up stitches along the blanket. Then pick up stitches as the picture shows. When you have finished picking up stitches, run a thread through all the stitches .

Knit the garter st and cast off. I like to cast off with a larger pin size or with an elastic cast off.

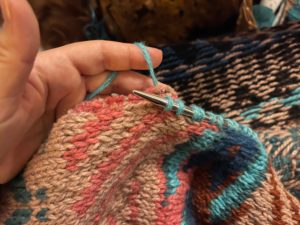
When you have finished the grooved edge of the Linkap joint, you need to pick up stitches to cover the wound edge. The stitches you placed on a thread are now placed on a Pinne.


Then work stockinette st and sew the coating over the wound edge.

When you have finished knitting the groove edge and coating on both sides of the blanket, it is time to make fringes.


Avslutt med å skyll opp pleddet og la det tørke flatt. Gratulerer du har nå strikket ferdig pleddet ditt! <3


